Table of Contents
- What Are The Tools You Will Need?
- How To Clip In The Hair Extensions All By Yourself?
- Step 1: Brushing your hair
- Step 2: Start with 3 clip extensions
- Step 3: Use the smaller 4 clip wefts
- Step 4: Take the next 4 clip weft
- Step 5:Take the second 3 clip wefts
- Step 6: Taking the 2 clip wefts
- Step 7: Take the 1 clip weft
- Putting in JuvaBun Hair Extensions
- Key Takeaways!
Getting your hands on good-quality hair extensions is the first step to perfection. You need to take care of things like brand repute, extension length, and weight. You also need to consider the color and type of extension. If clip-in extensions are your final choice, you are in for a treat.
Many people find it scary to put hair extensions at home. Instead, they prefer spending a huge amount of money on salons and hairdressers. This is often not necessary because you can easily put extensions by yourself. These aren't only very easy to put on hair, but also make for an amazing look. If you are unaware of how to put in clip in hair extensions yourself, here are some amazing tips for you.

What Are The Tools You Will Need?
Some of the tools that you will need before you begin the process include:
- Good quality hair extensions
- A soft and brittle paddle brush or a loop hair extensions brush
- Hair signature curler
- An extensions styler
- Clip and retail comb
- A mirror
How To Clip In The Hair Extensions All By Yourself?
Step 1: Brushing your hair
Before you put on any extensions, you have to first wash your hair with a good quality shampoo and hair conditioner. Once your hair is naturally dry, you need to brush your hair to remove any tangles. Start off by brushing your own hair using a soft paddle brush. This will ensure you break any hair, and you remove any rough tangles with ease.
Step 2: Start with 3 clip extensions
The next step is to separate a thin section of your hair with your fingers or a comb. Do this by starting with the nape of your neck and clipping the rest of your hair using a small hair clip. This will ensure the extra hair doesn't get in the way of the process.
Next, take a 3 clip weft and brush it out before using a clip to tie your hair. If you want to remove the tangles, you should start from the bottom and slowly work your way up the weft. This will effectively prepare your hair for the next steps.
The next step is to measure the extensions by placing them against your hair and ensuring that both are of equal length. This will ensure coherency in your hair. Moreover, it will ensure that the extensions fit perfectly into the sectioned natural hair.
After that is done, find the middle of the head and clip in the hair as close to the roots as possible. Additionally, you can also try pulling the section away from the scalp to have some leverage and to ensure extra hair comes in the way.
Once the middle clip has been attached, clip the right side and then the left. Then, gently pull the weft taught and apply the same procedure to the rest of the hair.

Step 3: Use the smaller 4 clip wefts
Separate a small and straight, thin section of your hair and leave an inch above the first clipped weft. Next, gently secure the rest of the hair using a clip. Ideally, this section should be about the top of both your ears. Before you move on to the next step, make sure there aren't any tangles or knots.
Finding the center of your head and clipping in the middle two clips into the roots of your hair is the next step. When you are clipping in the middle clips, make sure to stretch the weft to the sides to decrease any bumps.
Step 4: Take the next 4 clip weft
Separate a thin section of your hair above the second clipped in extension or weft. Clip away the rest of your hair. Make sure that this section is the widest part of your head, as it needs to fit in the largest 4 clip wefts.
Next, take the 4 clip weft, which is approximately 8 inches wide, and measure it against your head to make sure it is equal to the length of your hair. You can also cut it to make sure it is the right size.
By clipping in the side clips, carefully clip in the middle of the two clips in the sectioned hair.
Step 5:Take the second 3 clip wefts
About two inches below the crown of your head, make a small section and clip the rest of your hair away with a clip.
Take the second 3 clip wefts and carefully measure them against your hair to make sure it is the right length. Next, find the center of your head and clip in the middle section and the sides using a clip. At the end of this step, you can take a breath of relief as all the wefts at the back of your head are at their place and only the ones at the sides are left.
Step 6: Taking the 2 clip wefts
You are already done with the harder part. It is now time to attach the wefts of extensions on the sides. These will not only add volume to your hair but will also ensure greater coherence and aesthetics.
Additionally, adding wefts to the side make your hair look natural. You can also achieve a seamless look with the help of longer extensions on the sides.
For this step, you need to separate a straight, thin section of your hair about two inches above your ear’s side. Make sure to clip any excess hair away. Next, take a 2 clip weft and secure the clip closest to your hairline first. Now, by gently securing the second clip closer to the back of your head, you can release the clips holding the hair above the ears.
Step 7: Take the 1 clip weft
This is the last step in the process. For this, you need to separate a section of hair right above the place where you have installed the 2 clip weft. Next, brush out the two 1 clip wefts and clip them together to secure them. You can place these 1 clip wefts in more than one place- precisely any place that needs more blending.
Once you are done, brush your hair, check yourself in the mirror to ensure you have a well-blended look. You can also make adjustments to the back if any part of the hair looks out of place.
Also, patience is key. You shouldn't expect to put in hair extensions perfectly the first few times. But with practice, we assure you that you will be able to perfect the procedure in no time.

Putting in JuvaBun Hair Extensions
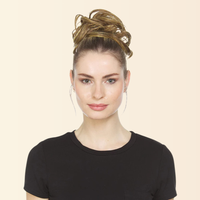
JuvaBun hair extensions make for an excellent choice. They are also very easy to clip in. to initiate, you will need a comb for parting. You will also need a couple of special clips or hairpins to fasten the strands. Here is a
Step to step guide to what you have to do
- Start by combing the hair and straightening them to create an even center parting.
- Make another parting on both ends slightly below the center. Gently, fix the JuvaBun hair extensions above this sectioned hair.
- Next, you need to use an overhaul curl and attach it to the sides and fasten it.
- Once the ply is fixed securely, you can lower it and cover it with strands of wefts. Just make sure to fix them a little higher to add coherence to the look.
- Next, loosen your hair, comb them to remove any tangles, and detach the hair layer above the ears. Moreover, secure the wefts with the help of a barrette. Take another clip in the extension set and attach it just like you did the ones above. Repeat this procedure on each side and in the back of your head. Use a hair spray to fix any stray hair.

Instructions for For narrower strands
- Separate your hair and section them using your index finger. Make sure to leave a layer of hair just above the ear and the temple level.
- Next, secure your hair’s top with the help of a clip or a barrette.
- Take a strand of extension and make sure to attach it the same way you had all the previous strands.
- The attached strand should be lightly combed at the roots to remove any knots or tangles. Next, sprinkle with varnish and attach the clip in hair extensions to its place.
- Once you are done, you can comb all the hair together, curl them or straighten them according to your own preference.
Key Takeaways!
There are a lot of brands out there, but none of them offer the quality and reliability like JuvaBun. The brand is not only known for its excellent reputation but it is also considered one of the ideal brands for buying many kinds of hair products. If you are finding it hard to find extensions that suit your hair and offer longevity, this is the brand for you.
You can also look at other hair products. All of them are backed by an excellent warranty, and you can find a range of amazing discounts. At the end of the day, you will go home with a brilliant product in your hand.
Read Also:





Leave a comment
This site is protected by hCaptcha and the hCaptcha Privacy Policy and Terms of Service apply.